
We do a lot with computers nowadays. Most people use them for work as well as storing personal files like photos and tax documents. Until you experience a hard drive failure, it can be one of those things you don’t think about or worry about.
Trust me, you should be thinking about it and worrying about it. Studies on hard drive failure rates show that about 3% of drives fail within the first year, while by year 4 about 20% of drives will have failed. Everyday we try to help people get back data on drives that have failed. Baby photos, tax documents, work projects years in the making, you name it, we have tried to recover it.
While we are able to recover data in about 70% of the cases we see with our $100 and $300 recovery services, 20% of the time recovery is only possible by using extremely expensive recovery techniques. 10% of the time the data is not recoverable by anyone.
All this to say, if you are not backing up, you need to. Right away. If you are backing up, go check to make sure your backup system is working and all your important information is actually on the backup drive.
We offer a backup service that includes a 1TB portable drive and setting up your computer to backup using time machine. We backup all your data and make sure the backup is complete. All you have to do is plug the drive in every day or night to your computer and leave the computer on while the incremental backups complete. We recommend using this setup with 2 backup drives if possible, but at least have one.
If you want to setup the backup for yourself, you have a lot of options. I am going to cover the most popular of those options (Time Machine) in this post, but just know there are literally dozens of ways you can backup your data.
First, it is best to have at least 3 instances of all your data. One is on your computer, one should be on a local backup that is backing up as often as you create files (so if you only use your computer once a week, backing up at the end of that day once a week would be fine), and a secondary backup should be kept offsite.
Time Machine:
Time machine is probably the best option out there for home users. Time machine is an application built into every mac since 2007. It allows you to easily backup EVERYTHING on your mac to an external drive or time capsule.
Time machine completes an initial backup, then every hour it backups anything that has changed on the computer. So if you only change 1 small file on your computer, Time Machine will know and just backup that 1 small file. If you change or add tons of files to your computer, time machine will backup all of them.
Time machine keeps the old versions of files (and files you have thrown away), until your backup drive gets full. Once your backup drive gets full, Time Machine will delete the oldest files that were deleted, to make room. Time Machine will NOT delete files from the backup that are currently on your computer, it will just delete files that you have deleted or changed in the past that it has archived in case you needed to get them (because you accidentally deleted them, etc).
Setting up Time Machine:
Setting up time machine is incredibly simple. I recommend starting with a brand new drive. Plug the drive into the computer, and your computer will likely prompt you asking if you want to use this new drive as your Time Machine backup drive. Click “Use for Backup”, and Time Machine will do the rest.
If your computer does not prompt you when you plug in the new drive, don’t worry! We can set it up the long way.
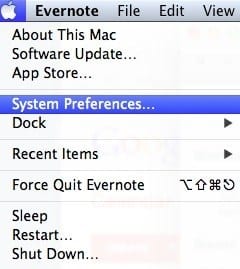
1. Click on the Apple logo at the top left corner of the screen, then click on system preferences in that list.
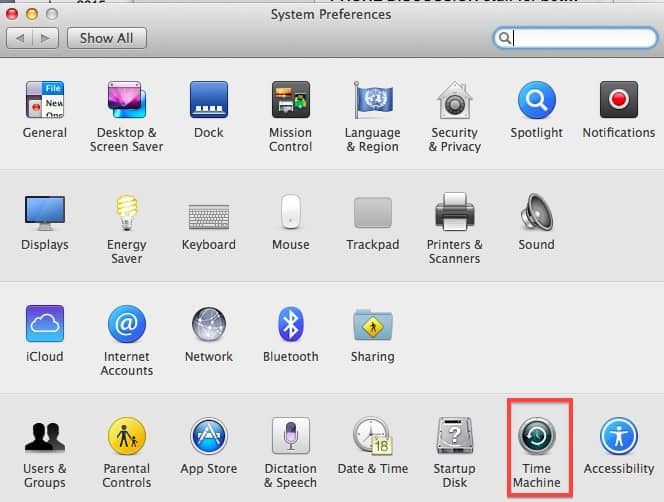
2. Click on Time Machine in the system preferences window.
3. Click “Select Backup Disk”.
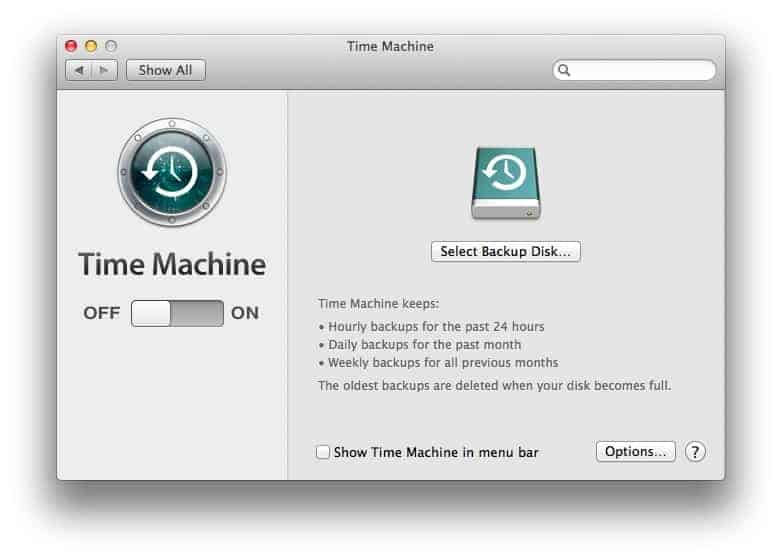
4. Choose your new backup disk and click “Use Disk”
Done! Time Machine will do the rest.
Setting up Time Machine to backup to more than one drive:
As I mentioned earlier, the best backup system has a backup onsite, and a backup offsite. I recommend having two drives setup with time machine. One of the drives you keep connected to your computer (or connect it every time you create or change important files), and the other drive you store offsite at your office, family members house, safe deposit box, or somewhere else safe.
Every week or so, swap the drives. Take the one that you have been using constantly and swap it with the one offsite. Of course you can add a 3rd or 4th drive to this system and have tons of backups. I am in the camp that says you can’t have too many backups.
To add the drive in time machine:
1. Click on the Apple logo at the top left corner of the screen, then click on system preferences in that list.
2. Click on Time Machine in the system preferences window.
3. Click “add or remove backup disks”
4. Choose your new backup disk and click “Use Disk”
Time Machine will ask you if you want to use both drives, or if you want to replace the drive you already setup with this new drive. Click Use Both. That way it will backup to both drives.